Running Containers with a Read-Only Filesystem.
Let’s dive into how to run your application on a read-only filesystem container. In this blog article, I will explain how to run your container with the read-only option. Before we start, let’s explore the advantages and disadvantages of running containers with a read-only filesystem.
Advantages
- Reduced Attack Surface: Running your application inside a container with a read-only filesystem means the application doesn’t have write access to the filesystem. If there’s an exploit in the application that a hacker could use to upload malicious scripts, this will be prevented because the application will fail to write files due to the read-only file system.
- Immutable Infrastructure: Read-only containers promote the concept of immutable infrastructure, where containers are treated as disposable. Any changes are made by creating new containers rather than modifying existing ones.
- Good for Audit and Reporting: Running containers with a read-only filesystem can help you pass security requirements. For example, AWS Security Hub checks if containers run with the read-only option. If they are not, your overall security score may be impacted.
Disadvantages
- Debugging: There aren’t many disadvantages, but one notable issue is the difficulty in debugging containers during runtime. You might not be able to install debugging tools in read-only containers.
With these points in mind, let’s move on to the steps to run your container with a read-only filesystem.
Running Containers with a Read-Only Filesystem
Turning on the read-only option for containers across various platforms like Docker, AWS ECS, and Kubernetes is straightforward. You need to pass the correct argument. However, challenges arise when you start the container with a read-only filesystem. Your application might crash due to permission issues, as it won’t be able to access the filesystem to create necessary files during startup.
Example with Docker
To run a container in Docker with a read-only filesystem, use the — read-only option:
docker run - read-only nginxSimilarly, in a Docker Compose file, you can set read_only: true:
services:

   test:

   image: busybox

   read_only: true
Kubernetes and AWS ECS also provide options for creating read-only containers.
Challenges and Solutions
Let’s take a basic container image, such as the Nginx image. Your application container might be more complex than Nginx, but the concepts remain the same.
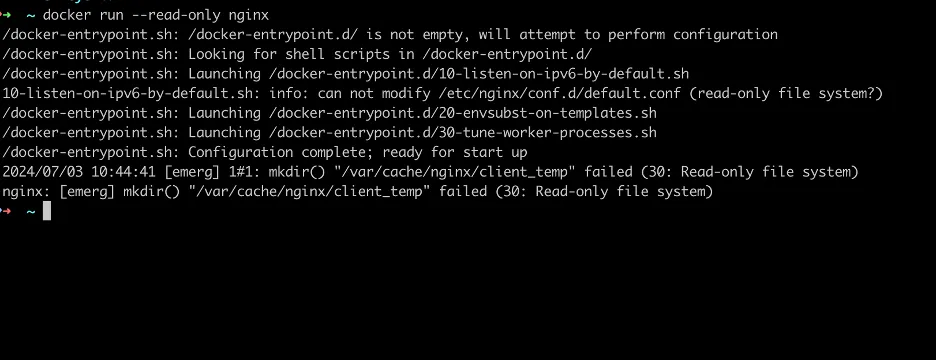
When you run the Nginx image with a read-only filesystem, it will fail to start immediately because it cannot access certain temporary files like nginx.pid and client_temp.
Example Error: Nginx fails to start as it is unable to create nginx.pid and client_temp.

docker run read-only
Solution 1: Using –tmpfs
You can use the — tmpfs option of the docker run command to provide temporary storage for the container:
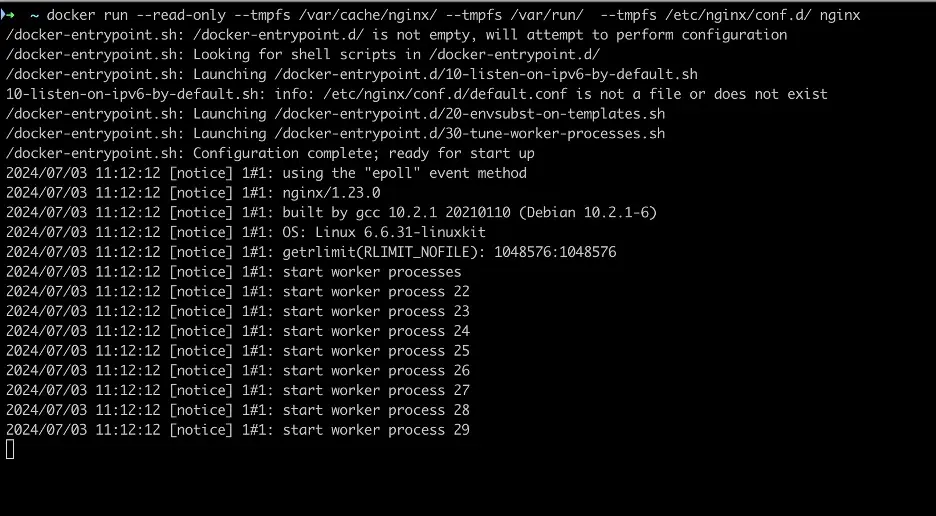
docker run - read-only - tmpfs /var/cache/nginx/ - tmpfs /var/run/ nginxThis allows the Nginx container to start without crashing. However, there might still be errors related to other files, such as /docker-entrypoint.d/10-listen-on-ipv6-by-default.sh being unable to modify /etc/nginx/conf.d/default.conf.

docker run read-only with tempfs
Since the — tmpfs option mounts tmpfs on the specified directory, it causes any existing files to be overwritten by the mount point. This can result in errors like 10-listen-on-ipv6-by-default.sh: info: /etc/nginx/conf.d/default.conf is not a file or does not exist.
Solution 2: Using Dockerfile VOLUME Instruction
In such scenarios, you can use the VOLUME instruction in the Dockerfile to build a custom Nginx image, which will mount a volume during startup. This approach prevents existing files from being overwritten.
Note About Dockerfile Volume Instruction: Volumes are initialized when a container is created. If the container’s base image contains data at the specified mount point, that existing data is copied into the new volume upon volume initialization. (Note that this does not apply when mounting a host directory.)
Dockerfile for Nginx with VOLUME Instruction:
FROM nginx:latest

VOLUME /etc/nginx/conf.d
Build and run this custom Nginx image:
docker build -t nginx:custom .

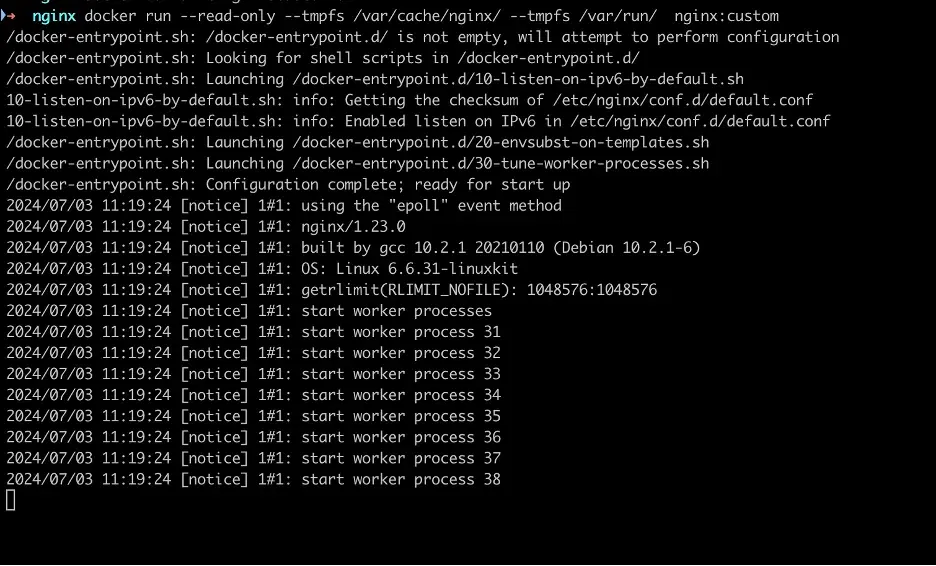
docker run --read-only --tmpfs /var/cache/nginx/ --tmpfs /var/run/ nginx:custom
This ensures that Nginx runs without errors.

docker run read-only tempfs and cache write directory
Note: The — tmpfs option is available with docker run, docker-compose, and AWS ECS. However, AWS ECS with Fargate doesn’t support the — tmpfs option. For Fargate, you can use Docker volumes. Fargate option issue link.
Solution for Kubernetes: Using emptyDir
In Kubernetes, you can use the emptyDir concept to get temporary write access space in a read-only container.
Sample Kubernetes YAML with emptyDir Implementation:
apiVersion: v1

kind: Pod

metadata:

   name: test

spec:

containers:

   - name: container

     volumeMounts:

     - mountPath: /tmp

       name: tmp

       subPath: tmp

     - mountPath: /run

       name: tmp

       subPath: run

    volumes:

    - name: tmp

      emptyDir:

        medium: Memory

        sizeLimit: 64Mi
Additional Challenge: Identifying Required Write Access Directories
One more challenge arises when you plan to convert your application to a read-only container: how to find which directories are required for your application to write access for it to work properly.
Solution for This Problem:
You can use the docker diff command. Docker keeps a record of all files and directories created or modified by your application after the container started. So you can run your application in write mode, use all features, and then run the docker diff command against your container. This will produce a list of all files and directories created and modified. You can use this information to plan your journey to go read-only containers.
You can use tmpfs and Dockerfile Volume instruction combined to fix issues where your application needs write access to specific directories.
Example:
Below is the output of the docker diff command for one of the applications.

docker diff command
You can use this information to adjust your Docker configurations accordingly. As you can see cache folder we can use tmpfs as that is mostly empty folder created after container starts but any folder which might have file already for that we can use Volume in Dockerfile.
Conclusion
Running containers with a read-only filesystem enhances security and promotes immutable infrastructure. However, it introduces challenges such as permission issues and difficulty in debugging. Using options like — tmpfs, Dockerfile VOLUME instructions, and Kubernetes emptyDir can help overcome these challenges.


