Getting started with NEXT.JS 14
In this article, we’ll look at how to get started with Next.js 14.
As we know, Next.js which is built on top of React. So, what sets Next.js apart from React?

Before we dive in, let’s briefly understand the difference.
When we first start with React, we often come across the statement “React is a library and not a framework”, which may not make sense at first.
But, this is where all of it begins.
According to the definitions,
A library is a pre-written module that a developer can use to accomplish common tasks more efficiently.
This is exactly what React does. Back in the early days of frontend web development, adding even a single element dynamically to a page required a lot of explicit code and a significant amount of effort. However, with React, this same task can be accomplished swiftly without the need for explicit coding, all thanks to its declarative nature. Just provide the structure and content, and React handles the rest, including DOM manipulation.
But the issue here is that React is primarily focused on certain aspects of the application, such as front-end UI components. Even basic features like page navigation require an additional package. It only offers solutions for the UI, while the developer has to handle the rest.
On the other hand,
A framework provides similar capabilities to libraries, but with added features. It enforces code standards and conventions, abstracting repeated boilerplate code and complex low-level details.
This is where Next.js comes in. It’s built on top of React, offering access to all of React’s features, along with many additional features. For example, it offers static and dynamic rendering options (basically SSG and SSR), file-system based router, built-in optimization for images and fonts, built-in support for CSS modules, and more. Additionally, it provides a “Route Handler” to create API endpoints and perform server-side logic inside the Next application.
😅 Yeah, I know all of that feels like

In a nutshell, frameworks like Next.js streamline the development process by providing nearly everything out of the box, allowing developers to focus more on building instead of managing all the puzzle pieces, unlike libraries such as React.
There’s no right or wrong choice between Next.js and React. With React, the developer has more control, while with Next.js, the framework has more control.
Alright, let’s get started on setting up the Next.js project.
Pre-Requisite Knowledge
It just require a basic understanding of HTML, CSS, JavaScript, and React.
Installation
Open the terminal, navigate to the folder where you want to locate your project, and run the following command.
npx create-next-app@14.2It will give the following options to choose from
What is your project named? my-app
Would you like to use TypeScript? No / Yes
Would you like to use ESLint? No / Yes
Would you like to use Tailwind CSS? No / Yes
Would you like to use `src/` directory? No / Yes
Would you like to use App Router? (recommended) No / Yes
Would you like to customize the default import alias (@/*)? No / Yes
What import alias would you like configured? @/*
Make sure to select all the options based on your preferences, but be sure to choose “Yes” for the “Would you like to use App Router?” option. This is the recommended approach for building a Next.js project, as it incorporates all the latest features that Next.js has to offer.
After completing all the installation steps, navigate to the project folder.
Project Structure
This is how the project structure will look, including all top-level folders and files.
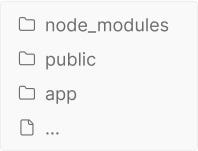
We mainly work with only 2–3 folders,
public— which contains all the static assets.app— which is essential as it stores all the page files and handles the routing. Another folder we’ll manually add iscomponents— which we add manually, where all the individual component files are stored and later combined to build the UI.- Lastly, the
node_modulesdirectory contains all the dependency package files, and we don’t make changes to this folder. Only thenpmcommand modifies this folder.
Let’s build a tiny project to understand things a little better.
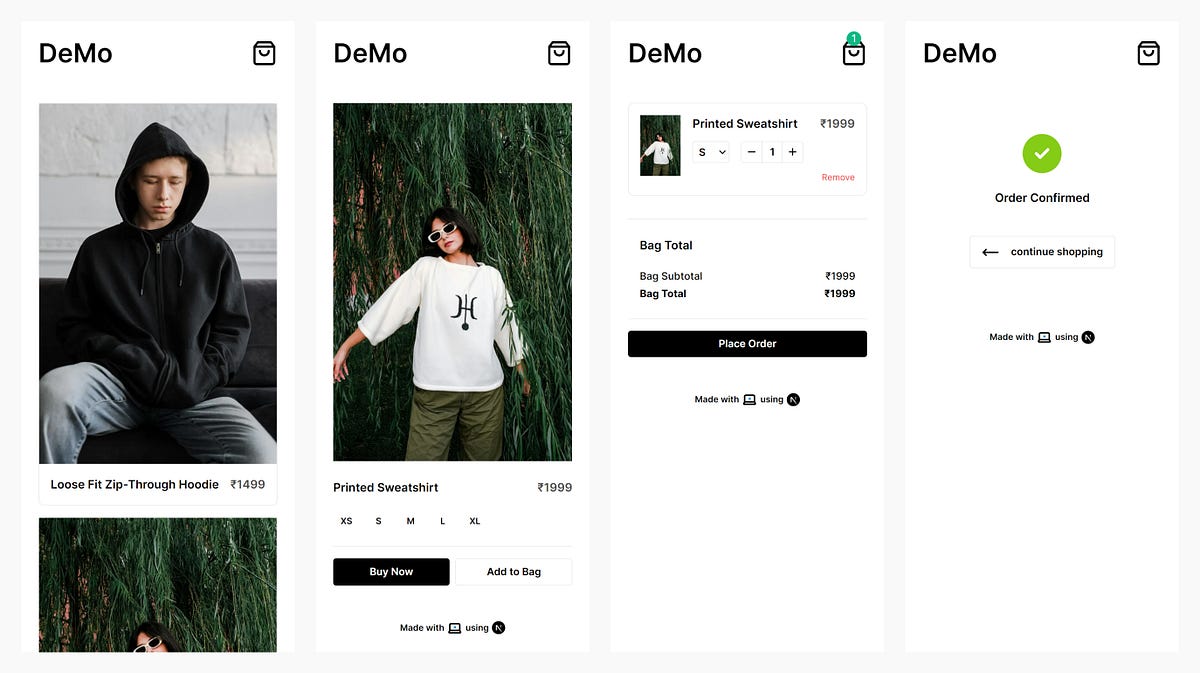
This is what we’ll build: a small e-commerce app consisting of four pages.
Home— where we can view all the products.Product Details— where we can view information about a specific product, choose a size and make a purchase or add the product to your bag.Bag(basically a cart) — where we can view all the products added, see the total value, and proceed with the order.Order Confirmed— where we can see that our order has been confirmed.
Creating Reusable Components
Let’s start by creating a components folder. Inside the components folder, create a header folder with a header file and a footer folder with a footer file.
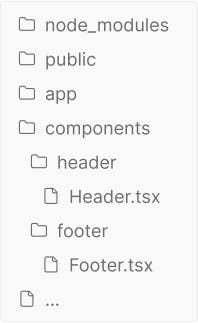
Add the following code inside Header.tsx
import Image from "next/image";
import Link from "next/link";
import bag from "../../public/bag.svg";

const Header = () => {
  return (
    <header>
      <nav className="header">
        <h1 className="logo">
          <Link href="/">DeMo</Link>
        </h1>
        <div className="bag">
          <Link href="/bag">
            <Image src={bag} alt="shopping bag icon" />
          </Link>
        </div>
      </nav>
    </header>
  );
};

export default Header;
and Footer.tsx.
import Image from "next/image";
import pc from "../../public/pc.svg";
import next from "../../public/next-logo.svg";

const Footer = () => {
  return (
    <footer className="footer">
      <p className="flex items-center gap-1">
        Made with{" "}
        <span>
          <Image src={pc} alt="pc icon" />
        </span>{" "}
        using{" "}
        <span>
          <Image src={next} alt="next icon" />
        </span>
      </p>
    </footer>
  );
};

export default Footer;
There, we have created our first two component, everything in the code above seems familiar, similar to what we would have done in React. Except two things,
- We are using the next
Linkcomponent instead of the regular HTML<a>anchor element which is the primary way to navigate between pages in Next.js and it also improves the performance of client-side navigation by prefetching and loading linked routes in the background, when theLinkcomponent comes into users viewport. - And, next Image component instead of regular HTML <img> image element, which helps with automatic image optimizations like serving correctly sized images for each device with modern image formats like webp and avif, preventing layout shifts when images are loading, etc.
Now, we will use both of these components inside a special file called layout.tsx. Navigate to app folder and you will find the file there.
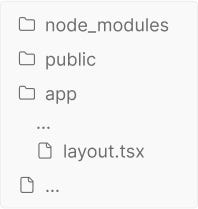
The file name itself indicates its purpose. The layout file, created in the root of the app, is known as the root layout. It applies to all the routes, is required, and must contain html and body elements. This enables modification of the initial HTML returned from the server. Similarly, if necessary, we can create more nested layouts. Likewise, we can create nested routes in a similar manner.
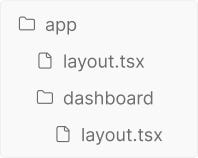
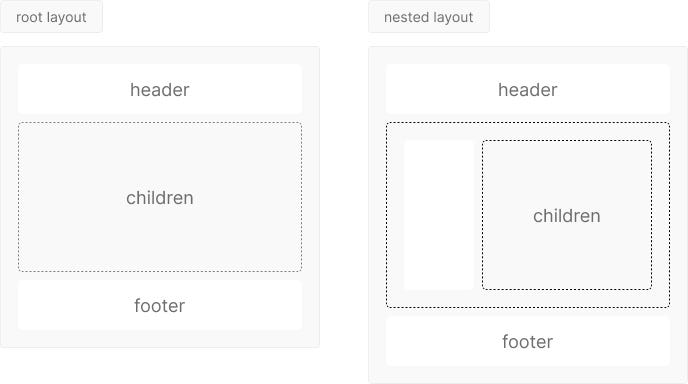
Add below code in the layout.tsx file.
import type { Metadata } from "next";
import { Inter } from "next/font/google";
import "./globals.css";
import Header from "@/components/header/Header";
import Footer from "@/components/footer/Footer";

const inter = Inter({ subsets: ["latin"] });

export const metadata: Metadata = {
  title: "Demo",
  description: "Demo app built using Next.js",
};

export default function RootLayout({
  children,
}: Readonly<{
  children: React.ReactNode;
}>) {
  return (
    <html lang="en">
      <body className={inter.className}>
        <Header />
        <main>{children}</main>
        <Footer />
      </body>
    </html>
  );
}
This will make the header and footer visible on all the routes.
Getting Data For The Application
Now, we need to access data for the application, typically located on the server, by making a request. In a traditional web development setup, a separate backend server would be created to handle API requests. This server would then execute the server-side logic and interact with a database to provide the necessary data. However, Next.js changes this approach with its built-in Route Handlerfeature. It allow developers to define server-side logic directly within their frontend application codebase, eliminating the need for a separate backend server.
We simply need to create a folder named api within the app folder and then add a file named route.ts. However, since we are working on an e-commerce app, we want to improve readability by creating an additional nested folder inside api called products, and then including a route.ts file within it.
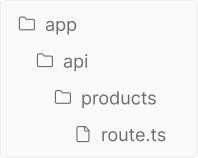
It supports the following HTTP methods: GET, POST, PUT, PATCH, DELETE, HEAD, and OPTIONS.
To simplify the process, we will stimulate the database by just creating data.ts in the data.ts folder, with the sample code below.
export const data = [
  {
    id: "c27be251-4e69-4aeb-a766-dbc01bde66e5",
    category: "men",
    product_type: "sweater",
    title: "Loose Fit Zip-through hoodie",
    description:
      "Zip-through hoodie in lightweight sweatshirt fabric made from a cotton blend with a soft brushed inside. Jersey-lined, drawstring hood, a zip down the front, diagonal, welt side pockets and wide ribbing at the cuffs and hem. Loose fit for a generous but not oversized silhouette.",
    sizes: ["XS", "S", "M", "L", "XL", "XXL"],
    color: "Blue",
    image:
      "https://example.com/zip_through_hoodie_eohged.jpg",
    price: 1499,
  },
  ...
];
We will create a handler function for the GET method inside route.ts and return the data array in the response. All the server-side logic goes inside this function.
import { data } from "../data";

export async function GET() {
  return Response.json(data);
}
Now, within the app folder, you can locate the page.tsx file, this is the root page (basically a homepage) which can be accessed by visiting http://localhost:3000/. Similarly for creating nested pages, we create sub-folders inside app folder
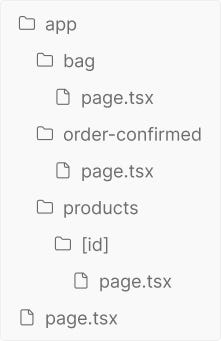
where bag can be access by visiting http://localhost:3000/bag and order-confirmed by http://localhost:3000/order-confirmed.
Now, inside root page.tsx add the following code
const fetchProducts = async () => {
  const response = await fetch("http://localhost:3000/api/products", {
    method: "GET",
  });

  if (!response.ok) {
    throw new Error("failed to fetch products");
  }

  return response.json();
};

export default async function Home() {
  const products = await fetchProducts();

  return <div> homepage </div>
}
And, this is where Rendering Methodscome into play. In Next.js 14 terms this will be called a Server Componentand the component will be statically rendered or in older terms, it will be SSG (Static Site Generation). It is considered Static Renderingbecause we have information ahead of the client requesting data. Till now, all the components we saw can be consider as Server Component which renders statically.
Let’s create a Product Cardcomponent, which we can render on the home page to display the products list. Create a folder called product_card inside the components folder and a page.tsx file within, with the following code.
import { IProduct } from "@/types/IProduct";
import Link from "next/link";
import ProductImage from "../product_image/ProductImage";
import ProductDetails from "../product_details/ProductDetails";

interface IProductCard {
  product: IProduct;
}

const ProductCard = ({ product }: IProductCard) => {
  return (
    <Link href={`/products/${product.id}`}>
      <div className="card">
        <ProductImage image_src={product.image} />
        <ProductDetails product={product} />
      </div>
    </Link>
  );
};

export default ProductCard;
We can observe that there are several elements involved here, and the component is made up of several other components. But, we won’t discuss the creation of every single component, as that is not the main focus of the article.
Let’s use the ProductCard component within the Home component to display all the retrieved products.
import ProductCard from "@/components/product_card/ProductCard";
import { IProduct } from "@/types/IProduct";

const fetchProducts = async () => {
  const response = await fetch("http://localhost:3000/api/products", {
    method: "GET",
  });

  if (!response.ok) {
    throw new Error("failed to fetch products");
  }

  return response.json();
};

export default async function Home() {
  const products = await fetchProducts();

  return (
    <section>
      <div className="grid grid-cols-1 gap-4  md:grid-cols-2  lg:grid lg:grid-cols-4">
        {products.map((product: IProduct) => (
          <ProductCard key={product.id} product={product} />
        ))}
      </div>
    </section>
  );
}
This is how the Home component looks after the update and below is the result that we get.

Dynamic Routing
In the ProductCard component, the wrapper element is the Next.js Link component, which navigates to /products/${product.id} route and this type of routing is called Dynamic Route. Below is how we define it.
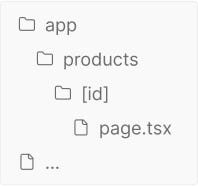
When we don’t know the exact segment names ahead of time and want to create routes from dynamic data, we can use Dynamic Segmentsthat are filled in at request time or prerendered at build time.
Dynamic Segments can be created by wrapping folder name with [], as we can see above. It passed as the params prop to layout, page, route, and generateMetadata functions.
Now, let’s take a look at the Product Detailscomponent code in page.tsx inside the [id] folder.
import { IProduct } from "@/types/IProduct";
import ProductImage from "@/components/product_image/ProductImage";
import ProductDetails from "@/components/product_details/ProductDetails";

const fetchProduct = async (id: string) => {
  const response = await fetch(`http://localhost:3000/api/products/${id}`);

  if (!response.ok) {
    throw new Error("failed to fetch product");
  }

  return response.json();
};

const page = async ({ params }: { params: { id: string } }) => {
  const product: IProduct[] = await fetchProduct(params.id);

  return (
    <section className="grid grid-cols-1 gap-6 md:grid-cols-2">
      <div className="product_image_complete">
        <ProductImage image_src={product[0].image} />
      </div>
      <ProductDetails type="complete" product={product[0]} />
    </section>
  );
};

export default page;
We are destructing id from params prop, which we passed to the Dynamic Route in ProductCard component.
...
const ProductCard = ({ product }: IProductCard) => {
  return (
    <Link href={`/products/${product.id}`}>...</Link>
  );
};
...
And, we can see in the Products component, that we are fetching individual product data with the use of the id that we received.
Lets, take a look at the URL we are requesting for a specific products data.
http://localhost:3000/api/products/${id}We have three segments: api, products, and ${id}. We already have a products folder with a route.ts file that serves as an endpoint to retrieve all the products. Now, we will add one more folder named [id] with route.ts, similar to what we did for the Product Detailspage, in order to fetch individual product data.
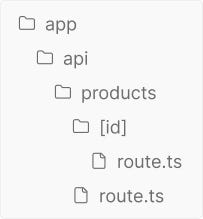
And, as we already know, we handle all the server logic inside the route.ts file, even this one is going to be a GET method.
import { data } from "../../data";

export async function GET(
  { params }: { params: { id: string } }
) {
  const item = data.filter((product) => params.id === product.id);
  if (item.length < 1) {
    return new Response("product not found");
  }
  return Response.json(item);
}
Similarly to our approach for retrieving all products, we do not connect to or query any database for data. We filter mock data based on the id from the params object and send it in the response.
This is how we get product data for our Product Details page and this is the result.
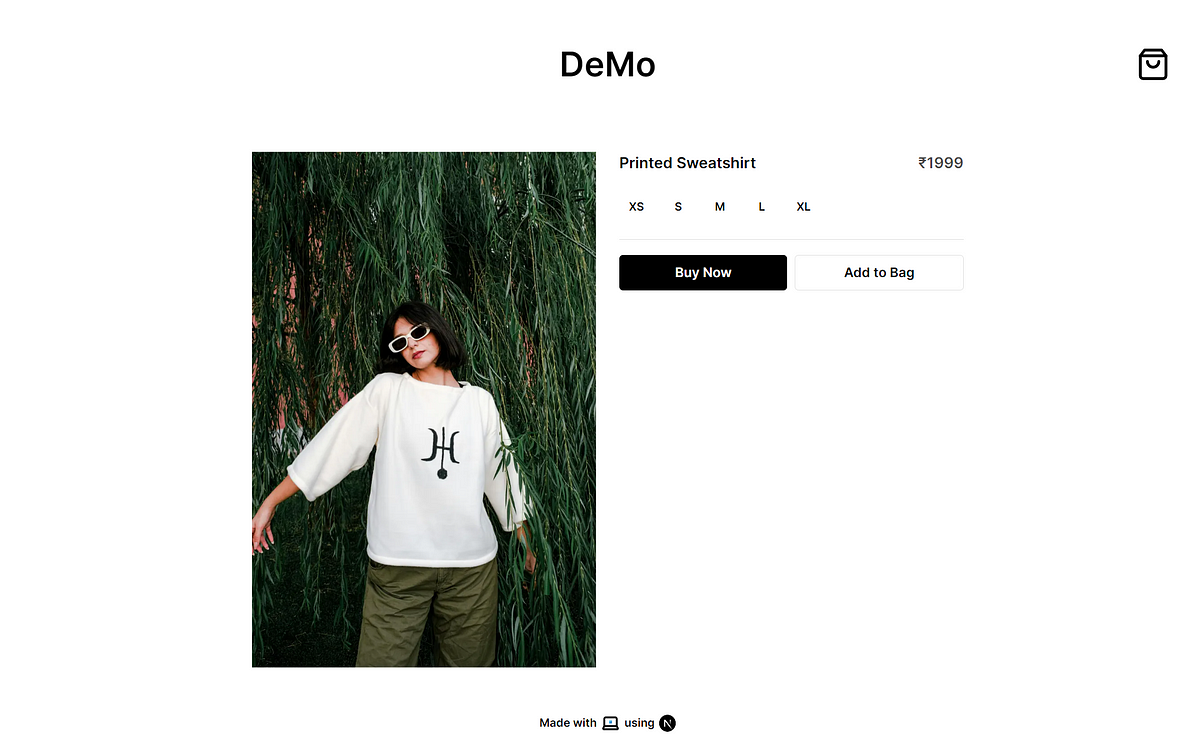
The Product Details page is made up of two components, Product Imagewhich is a Next.js Imagecomponent under the hood, but the ProductDetails is a client component, let’s take a look at its code.
"use client";
import { FormEvent, useState } from "react";
import { IProduct } from "@/types/IProduct";
import ProductTitlePrice from "../product_title_price/ProductTitlePrice";
import ProductSize from "../product_size/ProductSize";
import HorizontalRule from "../horizontal_rule/HorizontalRule";
import ProductButtons from "../product_buttons/ProductButtons";
import clsx from "clsx";
import useCart from "@/store/store";

interface IProductDetails {
  type?: "complete";
  product: IProduct;
}

const ProductDetails = ({ type, product }: IProductDetails) => {
  const [selectedSize, setSelectedSize] = useState <null | string>(null);
  const addToBag = useCart((state) => state.addToBag);

  const handleFormSubmit = (event: FormEvent <HTMLFormElement>) => {
    event.preventDefault();

    if (!selectedSize) {
      alert("please select a size.");
      return;
    }

    addToBag({
      id: product.id,
      image: product.image,
      title: product.title,
      price: product.price,
      sizes: product.sizes,
      selectedSize,
      quantity: 1,
    });
  };

  const getSelectedSize = (size: null | string) => {
    setSelectedSize(size);
  };

  return (
    <form
      className={clsx(
        "product_details",
        type === "complete" && "product_details_complete"
      )}
      onSubmit={handleFormSubmit}
    >
      <ProductTitlePrice title={product.title} price={product.price} />
      {type === "complete" && (
        <>
          <ProductSize
            sizes={product.sizes}
            selectedSize={selectedSize}
            getSelectedSize={getSelectedSize}
          />
          <HorizontalRule />
          <ProductButtons />
        </>
      )}
    </form>
  );
};

export default ProductDetails;
We can see the "use client” directive at the very top of the file. This convention tells Next that it has to be a client component. Rendering a component on the client side may be necessary for tasks such as adding user events or using hooks on the component.
We can find both cases in this component, state hook to keep track of selected product size, where state and setter function is passed to the ProductSize component is used to toggle product size to change the selected product state and the ProductButtons component consists of two buttons “Buy Now” which adds the selected product to the global state and moves to the Bag page and “Add to Bag” which adds the selected product to global state.
We’re even using hooks from a third-party library called Zustand, which is used for global state management. In our case, we are using it for the cart feature.
Also, we have a Bag page which is a client component.
"use client";
import { useRouter } from "next/navigation";
import ProductCardBag from "@/components/product_card_bag/ProductCardBag";
import EmptyBag from "@/components/empty_bag/EmptyBag";
import useCart from "@/store/store";
import BagTotalCard from "@/components/bag_total_card/BagTotalCard";
import PrimaryButton from "@/components/primary_button/PrimaryButton";

const page = () => {
  const { items } = useCart((state) => ({ items: state.items }));
  const clearBag = useCart((state) => state.clearBag);
  const router = useRouter();

  const handlePlaceOrderClick = () => {
    router.push("/order-confirmed");
    clearBag();
  };

  return (
    <section className="max-w-96 mx-auto  flex-col-center gap-4">
      {items.length !== 0 ? (
        items.map((item, index) => (
          <ProductCardBag key={index} product={item} />
        ))
      ) : (
        <EmptyBag />
      )}

      {items.length !== 0 && (
        <>
          <BagTotalCard items={items} />
          <PrimaryButton onClick={handlePlaceOrderClick}>
            Place Order
          </PrimaryButton>
        </>
      )}
    </section>
  );
};

export default page;
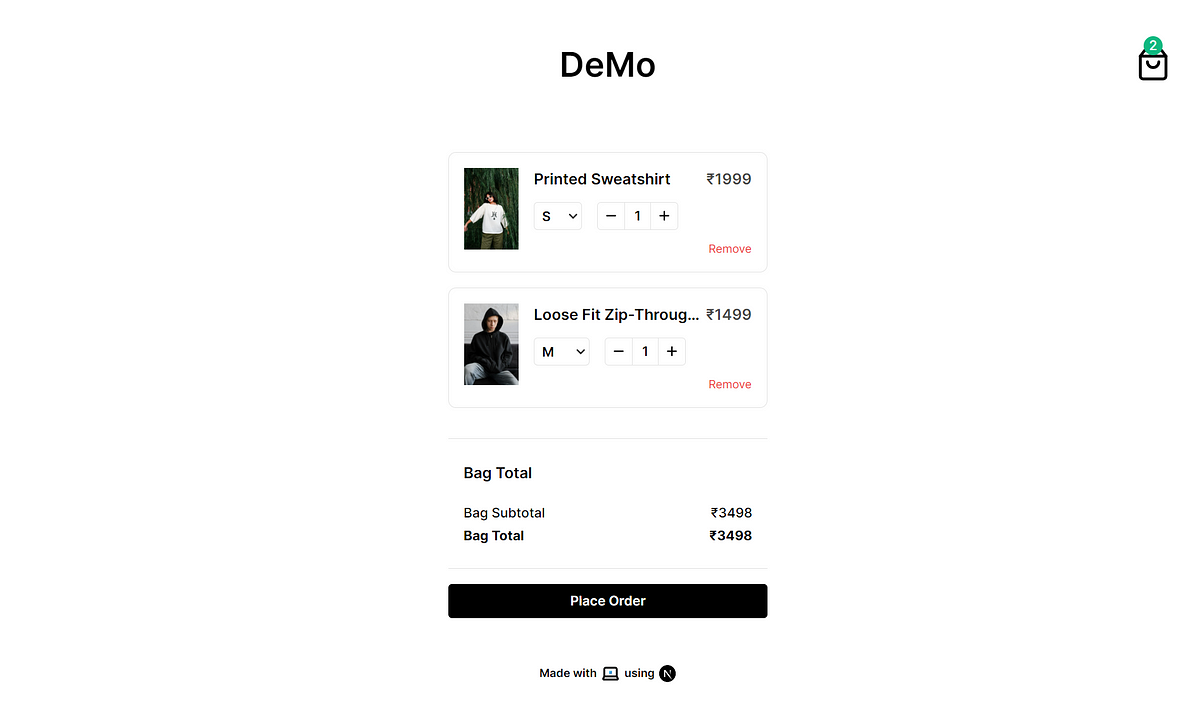
It consists of three main components and a button: EmptyBag and BagTotalCard, which are static components displaying static data, and the ProductCardBag, which has interactivity, along with the Place Order button.
import React from "react";
import ProductImage from "../product_image/ProductImage";
import ProductTitlePrice from "../product_title_price/ProductTitlePrice";
import ProductSizeBag from "../product_size_bag/ProductSizeBag";
import ProductQuantity from "../product_quantity/ProductQuantity";
import useCart from "@/store/store";
import { IProductBag } from "@/types/IProductBag";

interface IProductCardBag {
  product: IProductBag;
}

const ProductCardBag = ({ product }: IProductCardBag) => {
  const removeFromBag = useCart((state) => state.removeFromBag);

  const handleRemoveClick = () => {
    removeFromBag(product.id, product.selectedSize);
  };

  return (
    <div className="product_card_bag">
      <div className="product_image_bag">
        <ProductImage image_src={product.image} />
      </div>

      <div className="product_details_bag">
        <ProductTitlePrice title={product.title} price={product.price} />

        <div className="flex gap-4">
          <ProductSizeBag product={product} />
          <ProductQuantity product={product} />
        </div>

        <button
          type="button"
          className="remove_button"
          onClick={handleRemoveClick}
        >
          Remove
        </button>
      </div>
    </div>
  );
};

export default ProductCardBag;
And, the component is composed of the previously discussed components, except of ProductSizeBag,,
import React, { useState } from "react";
import { IProductBag } from "@/types/IProductBag";
import useCart from "@/store/store";

interface IProductSizeBag {
  product: IProductBag;
}

const ProductSizeBag = ({ product }: IProductSizeBag) => {
  const [currentSize, setCurrentSize] = useState(product.selectedSize);
  const updateSize = useCart((state) => state.updateSize);

  const handleChange = (event: React.ChangeEvent<HTMLSelectElement>) => {
    setCurrentSize(event.target.value);
    updateSize(product.id, product.selectedSize, event.target.value);
  };

  return (
    <select
      className="product_size_bag"
      name="size"
      id="size"
      defaultValue={currentSize}
      onChange={handleChange}
    >
      {product.sizes.map((size, index) => (
        <option key={index} value={size}>
          {size}
        </option>
      ))}
    </select>
  );
};

export default ProductSizeBag;
and ProductQuantity.
import { IProductBag } from "@/types/IProductBag";
import Image from "next/image";
import minus from "../../public/minus.svg";
import plus from "../../public/plus.svg";
import useCart from "@/store/store";

interface IProductQuantity {
  product: IProductBag;
}

const ProductQuantity = ({ product }: IProductQuantity) => {
  const updateQuantity = useCart((state) => state.updateQuantity);
  const removeFromBag = useCart((state) => state.removeFromBag);
  const decreaseQuantity = product.quantity - 1;
  const increaseQuantity = product.quantity + 1;

  const handleDecreaseQuantityClick = () => {
    product.quantity > 1
      ? updateQuantity(product.id, product.selectedSize, decreaseQuantity)
      : removeFromBag(product.id, product.selectedSize);
  };

  const handleIncreaseQuantityClick = () => {
    product.quantity >= 10
      ? alert("maximum 10 quantity can be added.")
      : updateQuantity(product.id, product.selectedSize, increaseQuantity);
  };

  return (
    <div className="product_quantity">
      <button
        className="product_quantity_button"
        onClick={handleDecreaseQuantityClick}
      >
        <Image src={minus} alt="minus icon" />
      </button>
      <div className="product_quantity_count">{product.quantity}</div>
      <button
        className="product_quantity_button"
        onClick={handleIncreaseQuantityClick}
      >
        <Image src={plus} alt="plus icon" />
      </button>
    </div>
  );
};

export default ProductQuantity;
This is the outcome when all of the above come together.
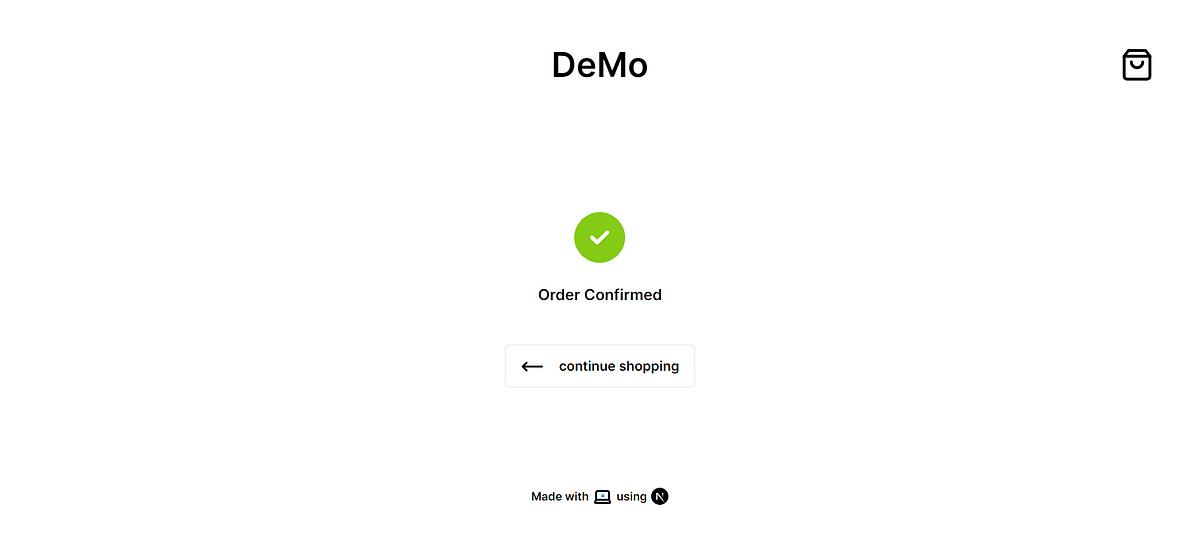
Lastly, Order Confirmed page which is a basic static page.
import React from "react";
import Image from "next/image";
import check from "../../public/check.svg";
import ContinueShoppingButton from "@/components/continue_shopping_button/ContinueShoppingButton";

const page = () => {
  return (
    <section className="h-[60vh]  flex-row-center">
      <div className="flex-col-center gap-4">
        <Image src={check} alt="check icon" />
        <p className="font-semibold">Order Confirmed</p>
        <ContinueShoppingButton />
      </div>
    </section>
  );
};

export default page;
And, the result.
Note: Additional tools were used, such as Typescript, Tailwaind CSS and Zustand.

Summary
In summary, Next.js extends React by adding features like server-side rendering, file-system routing, and built-in API handling, streamlining development with more out-of-the-box functionality compared to React’s focus on UI components and flexibility.

